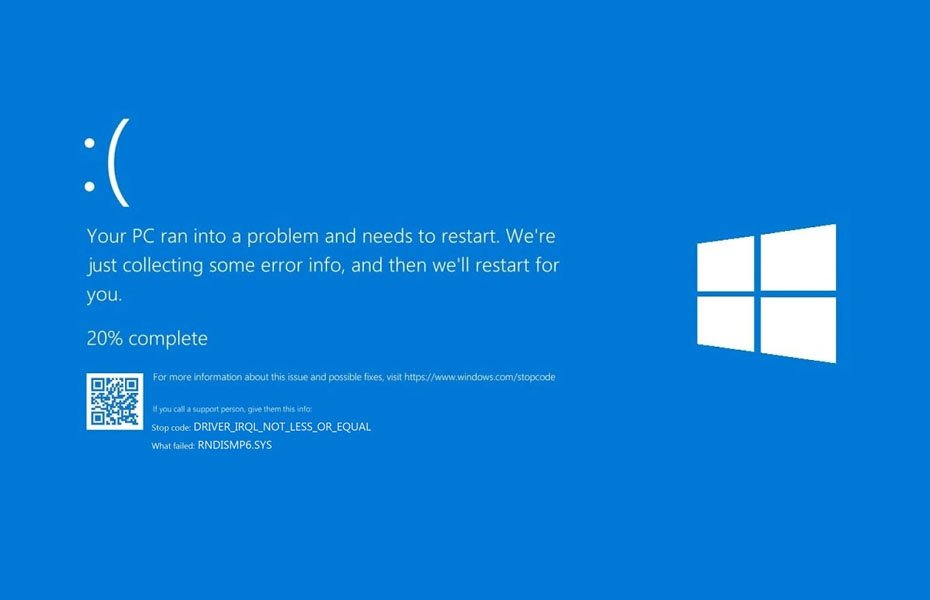
The DRIVER_IRQL_NOT_LESS_OR_EQUAL error on Windows 10 and Windows 11 usually indicates that a driver is trying to access a memory address that it doesn’t have permission to use. This often results in a Blue Screen of Death (BSOD). Here’s a step-by-step guide to troubleshoot and fix this issue:
1. Restart Your Computer
Sometimes, a simple restart can resolve temporary issues that cause the BSOD.
2. Update Device Drivers
Device Manager: Right-click the Start menu and select Device Manager. Expand categories and right-click on each device to select Update driver. Choose Search automatically for updated driver software.
Manufacturer’s Website: For critical hardware like graphics cards or network adapters, visit the manufacturer’s website to download and install the latest drivers.
3. Uninstall Problematic Drivers
Device Manager: In Device Manager, right-click the device you suspect might be causing the issue and select Uninstall device. Restart your computer, and Windows will attempt to reinstall the driver automatically.
4. Run Windows Update
Settings: Go to Settings > Update & Security > Windows Update. Click Check for updates to ensure your system is up to date with the latest patches and fixes.
5. Check for System File Corruption
System File Checker (SFC):
Open Command Prompt as an administrator (search for “cmd” in the Start menu, right-click, and choose Run as administrator).
Type sfc /scannow and press Enter. Let the scan complete and follow any instructions.
Deployment Imaging Service and Management Tool (DISM):
In Command Prompt, type DISM /Online /Cleanup-Image /RestoreHealth and press Enter. Wait for the process to finish.
6. Check RAM for Issues
Windows Memory Diagnostic:
Type “Windows Memory Diagnostic” in the Start menu and select Restart now and check for problems. Your computer will restart and test your RAM for errors.
7. Update BIOS/UEFI
Manufacturer’s Website: Visit your computer or motherboard manufacturer’s website to download the latest BIOS/UEFI firmware updates. Follow their instructions to update.
8. Perform a Clean Boot
System Configuration:
Press Windows + R, type msconfig, and press Enter.
In the Services tab, check Hide all Microsoft services and click Disable all.
Go to the Startup tab and click Open Task Manager. Disable all startup items.
Restart your computer and see if the issue persists. If it resolves the problem, re-enable services and startup items one by one to identify the culprit.
9. Check for Software Conflicts
Recently Installed Software: Uninstall any recent software or updates that might be causing the issue. Go to Settings > Apps, select the software, and click Uninstall.
10. Perform a System Restore
System Restore Point:
Type “Create a restore point” in the Start menu and select it.
Go to the System Protection tab and click System Restore. Follow the prompts to restore your system to a point before the issue began.
11. Reset or Reinstall Windows
Reset Windows:
Go to Settings > Update & Security > Recovery.
Under Reset this PC, select Get started and choose either Keep my files or Remove everything based on your preference.
Reinstall Windows:
If resetting doesn’t work, consider a clean reinstall of Windows. Make sure to back up your data before proceeding.